Tuesday, December 8, 2015

Christmas Candy Cuties

With a little tweaking of the stitching order, the addition of a sparkley pony tail holder and a split back. I turned these Christmas   photo frames into candy holder  ornaments for my granddaughter's class. 

How did I get the mittens to look like actual sweater knit? I used netting as my stabilizer! 


Friday, December 4, 2015

Crazy for stars!

I saw a version of this folded wreath online and had to make it!
It wasn't hard at all .
I used  6 1/2" squares of the focus ( back that flips up) and a 5 1/2" squares of the solid with 1 inch sashing sewn around. Used fusible fleece to give it shape.
Sew pairs with right sides together, leaving a space to flip right side out. Whip stitch closed. To mark sewing lines measure 3" down from corner and Mark, then 2 " from opposite corner, diagonally .Do this on both sides of the square. Use a ruler to draw the line from one point to the other. I used a frixion pen. You don't have to mark every square, just every other one. Iron off marks when all squares at joined . Oh, there are 12 squares in all. Then lift corners and join with a bead on top

.


Go! Sew!!

Thursday, November 5, 2015

New Book / Quilt Club!

I became part of a new book/quilt club!! Eeekk! I'm so excited! It's the best of both worlds! We read books AND make quilts based on those books . How cool is that!! 
I attended my first meeting this week and I brought each member a book mark I made with the club name on them. 
So cute! 

Tuesday, October 13, 2015

Moving is a *&$%@!!

That, my friends, is a 26' Uhaul truck! We packed that puppy to the ceiling from front to back! The sad part? It was all from an apartment we occupied for the past eight years (that's another story), and we are moving BACK to our house (WHICH IS FULLY FURNISHED!!), two hours away. It took us 2 days to pack and load up that truck, then another day to unload it. Good! Done, you say? Not even close! There were 100 boxes in that truck . All 12"X 12" or 16" X 16".  I now have towers of boxes in almost every room of my small two bedroom house. My son's room (he's away at college, whew!), is packed with ALL THE BOXES FOR MY SEWING ROOM (30 OF THEM !!), And , I do mean packed! You can stand in the doorway , and that's as far as you can go!

Problem No. 1- My sewing room is not complete! The things I have in there needs to come out so I can put the flooring/rug down.

Problem No. 2 - My house was not lived in for 8 years! EVERYTHING in the kitchen had to be washed, weeded out, or painted. Yes! I washed every dish I own! All that while unpacking what goes in there! THAT took me an entire week!

My hands are like sandpaper. My bruises have bruises. I get up at 4:30am to begin the task at hand. Oh, and did I mention that my water heater went out???? I have to heat water on the stove to wash all those dishes! My dear brother is coming to install the new water heater. We are switching from gas to electric, so a little work is involved.

Why would I go through all this, you may ask. Well, my husband was laid off. The company actually closed down. Oil field related. It's bad, people.

The upside?
We are back in our house. We are together. This , too, shall pass!


Tuesday, September 22, 2015

Fidget Pillows

I made these fidget pillows for the local nursing home. The Alzheimer's patients live them! Zippers, buttons , Velcro , smooth and rough ribbons , fringe and beads galore ! 
I know the picture is way below par , but it's the only one I have! 

Sunday, August 30, 2015

Wine Koozies

I had an order for some wine koozies and they are so cute! I had so much fun making them! 


Saturday, August 8, 2015

An Eagle for my Eagle Scout!

Today was the Eagle Court of Honor for our Eagle Scout. I made him a lone star quilt with an eagle in it. He then pinned some of his patches he collected through the years around the outside edges and we hung it on the wall behind his table at the ceremony. 

He loves the quilt and I am pleased with how it turned out. 


Thursday, August 6, 2015

Christmas Gifts continued


Although it's 90 degrees outside, now is the time to whip up some Infinity Scarves for all your prissy, diva friends . Everyone loves these scarves, and they are so easy to make! You will look like the crafty queen when you give these as gifts .

Here's what you need: 

13" by the width of the fabric. Most faux fur fabrics come 58-60" wide. That's what you need. So, if you get one that is only 28-45" wide, you will need to piece it together to get to 60". 
Not to worry, the seams in this stuff are hidden forever! 

Cut off the selvages. Yes, it will shed , so be prepared!


Next, fold in half lenghtwise ,with right sides together and pin.

Now sew all the way from one end to the other.


Then turn right side out with the seam in the middle and lie flat and straight.


Keeping one end flat, pick up the other end and twist it 1, 2 , 3 times, then put it back down.


Curve the two ends to meet. Insert one end inside the other end.


Pin through all four layers where you inserted the ends and sew through all 4 layers. Just go slow and don't worry, your stitches will never be seen!


That's it! Your scarf is complete! Now, how easy was that!?


Monday, July 20, 2015

Sunday, July 19, 2015

Time to make Christmas gifts!


Now is the time to start making Christmas gifts at a leisurely pace. No stress here! 
I will do my best to post instructions/ tutorials of a few popular ones . I will strive for one a week . Come back often to check my progress. 
We will be making:
Microwave Bowls
Microwave Potato Bags
Infinity Scarf
Zipper Bag for Cosmetics( or whatever you want!)

You can make anything you want! Want to know how to make something  you saw? Ask me! 

Ok, let's get to it! We are making a Microwave Bowl. This is basically a pot holder for your bowl of oatmeal ( or corn for dinner ) . Instead of grabbing a hot bowl, you lift out a soft warm potholder that your bowl is sitting in!
There will be lots of photos! You never know when this is someone's first project. Be patient . 


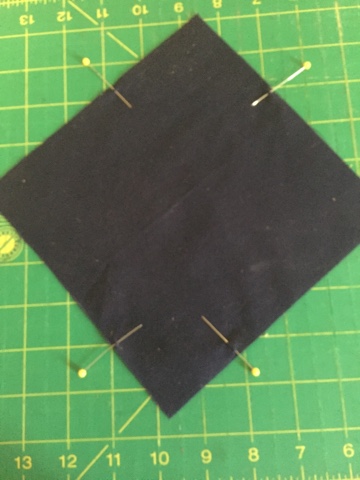
Note: ALL ELEMENTS MUST BE 100% COTTON for this project or YOUR BOWL WILL CATCH ON FIRE IN THE MICROWAVE!!!

You will need :
2 squares of COTTON fabric ,10 1/2"
You could use a Moda Layer Cake😀
2 squares of COTTON batting
 ( save those batting scraps!)
COTTON thread to match
Layer one of each fabric square on top of one of each of the batting squares. Draw an X on the back of each batting square , from corner to corner. Sew on this line, to hold your layers together. Now you have 2 quilt sandwiches.
Fold each sandwich in half, right sides together. On the folded edge, mark 3/4" on the open edges and 2 1/2" on the folded edge.Turn it so you can mark the other edge. THEN fold each one in the other direction and mark that fold the same.Do this on both sandwiches, on the batting side. 
Now connect your lines into a curve. Sew on the curve.


Trim the outer portion of the curve to 1/4", to have less bulk.


You now have the two halves of your bowl!


Put them together with right sides facing and batting on the outside. 


Line up the corners and the curves you just sewed. Before you pin the curves together, flip one to the right and one to the left so that they nest together.


You should have no less than 8 pins holding your bowl together.


On one side, between the corner and one curve (dart), mark a 2 inch space where you will not sew. I usually just put two pins together at the beginning and the end of the space. I know that I will not sew past 2 pins together.Do whatever works for you!

Once this is done, sew all around the edge (leaving that 2 inch space open!)


Trim the corners.


Now turn it right side out!


Push the corners out using a chop stick or some blunt tool


Find the opening and press the edges in the form the seam.


Go ahead and give the whole thing a good press.


Sew 1/4" from the edge all the way around


Your bowl is now done!!


Friday, July 17, 2015

Lots of pool time!

I have really been enjoying the pool this summer! I get in every morning (almost) at 9:00 and just swim from one end to the other, back and forth , until I get tired. Then I grab my green noodle and kick from one end to the other . I do this for about an hour. Yes, I'm calling it exercise, hehe! Sometime I get back in the pool in the evening, around 7:00, especially if it was a hectic day. Ya know, sometimes you just have to take a break from the sewing machine! 

Thursday, June 18, 2015

Quilt for a retiring principal

This is the quilt commissioned for a retiring principal. Teachers and staff signed blocks for me and they all went into the quilt. A very special keepsake for a very special person. 

Push me to blog!

I have a friend on a quilting FB page who just jumped into blogging. Yippee!! Not only is she blogging , she's pushing me to keep up with mine! Wow ! Thanks Jessica!! I need a push in that direction! 

Although I have not been blogging lately, I have been quilting! I made a quilt for a retiring elementary school principal . I am also in the middle of not one, but two t -shirt quilts!!  Both are for my youngest son , who just graduated from high school and recently became an Eagle
Scout!! Proud momma here!

Tuesday, January 13, 2015

Embroidery Machine

I recently acquired a small Brother Embroidery Machine. It only has a 4x4 hoop, but that's good for now. I have been doing lots of embroidery. Quilt blocks, pillow covers, Christmas ornaments. There are, surprisingly, oodles of designs out there for a 4x4 hoop! I am a little leery of 'free' designs. However , I have found a few sites that are, so far, very trustworthy for downloading free designs.

 My current favorite is       http://embroideres.com/free-embroidery-designs/

Theirs is broken in categories. Makes for easier searching for a particular design.
Like this cute one to welcome 2015....in Japanese! (? I guess it's Japanese!?) Year of the Goat?
Goat free embroidery design 2015